How to photograph lightning
Lightning is arguably one of the most difficult subjects to photograph correctly. Luck, gear, skill, and technique all play a role. This tutorial aims to help you take control of as many variables as possible, maximizing your chances of capturing quality lightning photos. Included is a basic guide on how to use the MK Controls Lightning Bug.
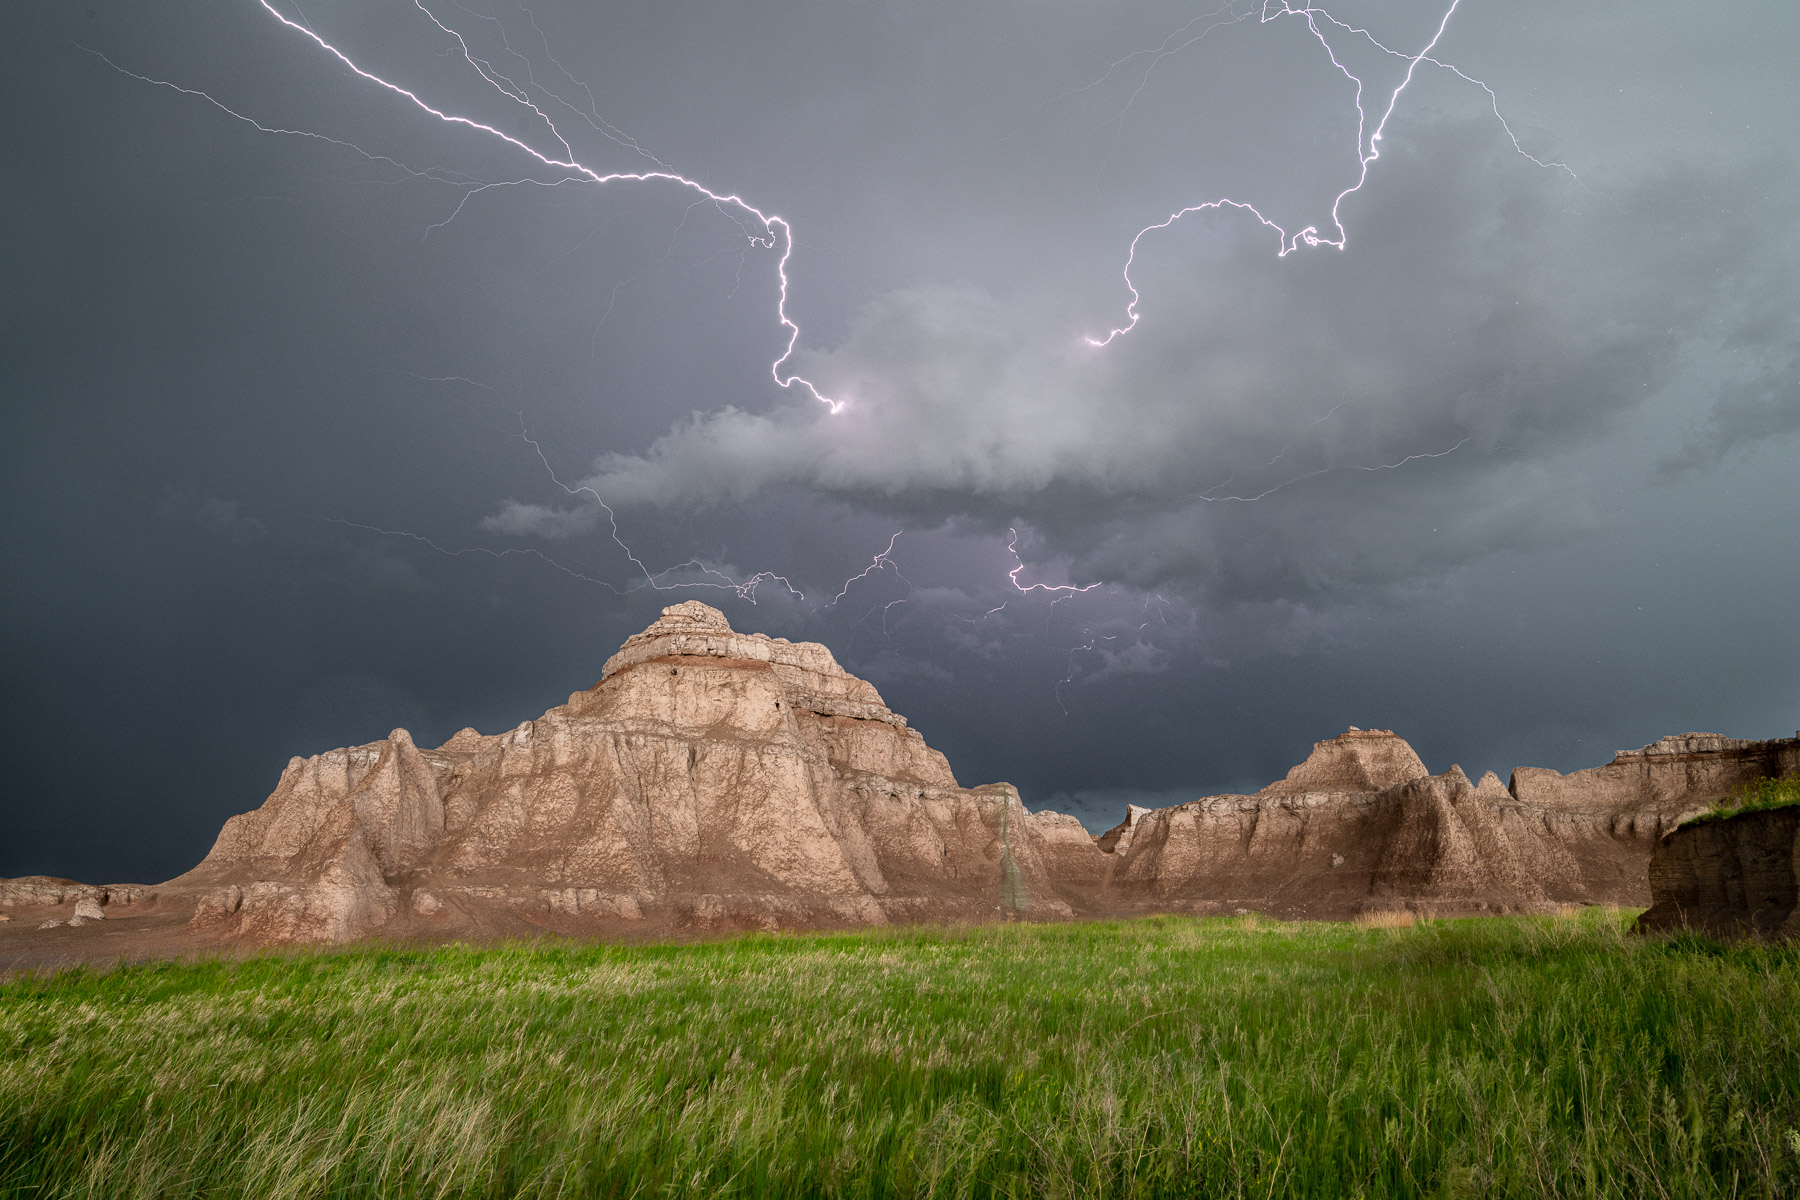
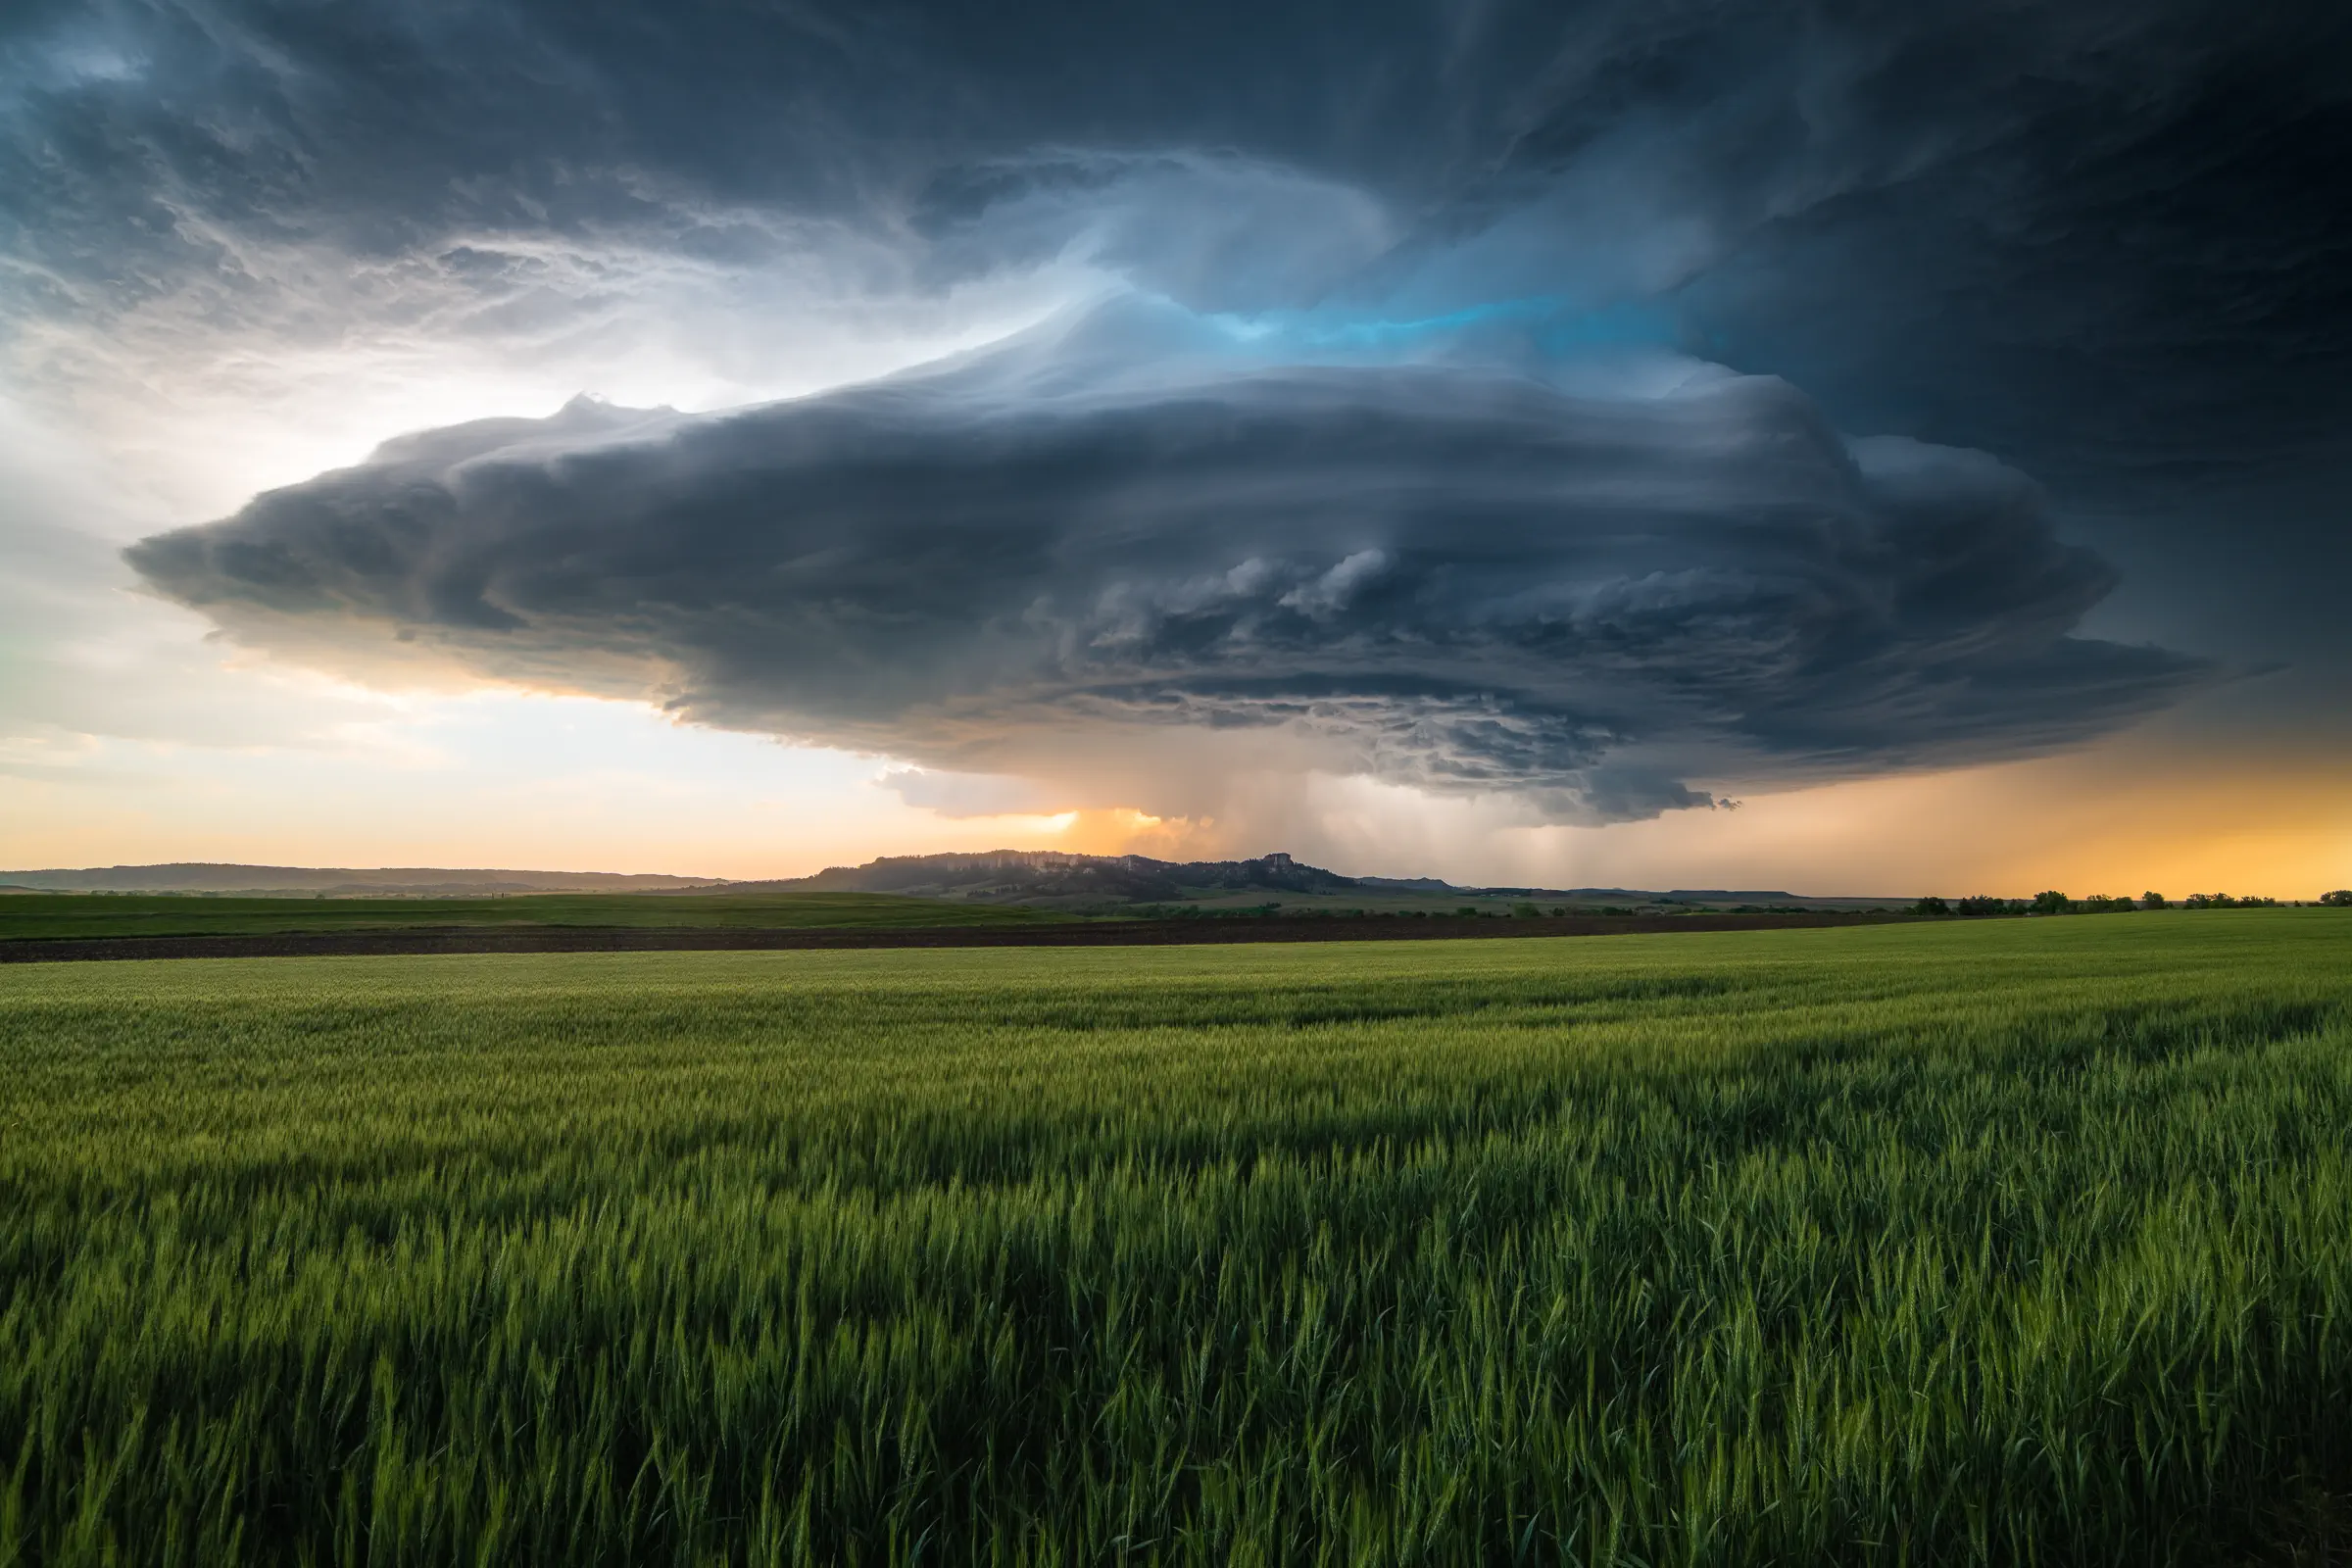
An explosion of lightning above Badlands National Park. No human has reflexes quick enough to capture scenes like this, so preparation, gear, and technique, combined with a good dose of patience, must all be on point when luck strikes.
Lightning is hard to properly photograph.
The average lightning bolt lasts 200 ms while the fastest recorded conscious human reflexes clock in at 150 ms. In the field, when one might have to wait for relatively long in between strikes, it's practically impossible to capture a flash just by keeping a finger on the shutter release.
This tutorial is for photographers with good grasps of the basics and will cover certain pieces of gear that can greatly help with capturing lightning, as well as my preferred configurations for optimal results. Note that I typically shoot lightning on a Nikon D850, so some of the advice may or may not apply differently on a different body.
A note on storm chasing
Storm chasing is a dangerous activity; while tornado accidents are on the extremely rare side, people will occasionally be struck by lightning, and car accidents are more likely when chasers are busy keeping an eye on storms while driving.
As a result, I don't think it's very responsible of me to give specific instructions on how to track and find storms, because I am not an experienced storm chaser. When I visit the Great Plains in search of supercells and tornadoes, I travel with a professional guide. I have been a guest with Twister Hunter (Jason Weingart) for 3 years now with a perfect safety record. I would've probably been caught in hail or bad lightning a couple times had I gone on my own, and I'd have probably missed a good handful of storms.
A supercell over Texas, shot on tour with Jason Weingart.
Nonetheless, should you decide to chase and photograph at your own risk, while I don't endorse it, here are a few basic safety tips:
- On safe driving: Keep eyes on the road, and if required bring a friend along to maintain visual contact with the storms you are chasing. When you park, make sure you're in clear sight of other vehicles on the road, and that you're well off the roadway.
- On positioning: When wanting to safely photograph storms, chasers position themselves South of the storm. Most violent storms travel Northeast, and South tends to offer the clearest view of the storm structure. This being said, keep in mind that storms can move in any direction, sometimes at speeds exceeding 100 kph (62 mph).
- On distance: I'm not 100% clear on this, but it seems a minimum distance of at least 10 to 15 km (6 to 9 miles) from the lightning is recommended. Again, this is not perfect science, and lightning can easily travel over 20 km (12 miles) from the thunderstorm. We've had close calls.
- On lightning protection: In the middle of a deserted field, with lightning around, the safest place is in your car. This is physics; while rubber tires will absolutely not stop a bolt from going into the ground, the metal frame of a vehicle acts as a Faraday cage and should protect you from a strike in the vast majority of cases.
Punching through an active tornado zone in Texas. Several areas of rotation on radar.
Shooting with an intervalometer and ND filters
The premise here is that the more your shutter stays open, the more likely you are to capture any eventual bolt. Many photographers will leave the camera on a tripod to capture hundreds of consecutive images in the hopes that their shutter will happen to be open when the bolt strikes. This is hugely wasteful for data storage and for the life of your shutter, but it's the most basic method and its success rate is pretty easy to calculate. Essentially, the percentage of time your shutter is open is the percentage of bolts you'll get.
I don't normally use this method unless I'm shooting at night. When I do shoot at night, I just plug a Vello Shutterboss into my camera (batteries not even required), set the shooting mode to the maximum burst rate (7 fps on my Nikon D850), and jam the shutter release button, and the camera can take a theoretically infinite number of pictures.
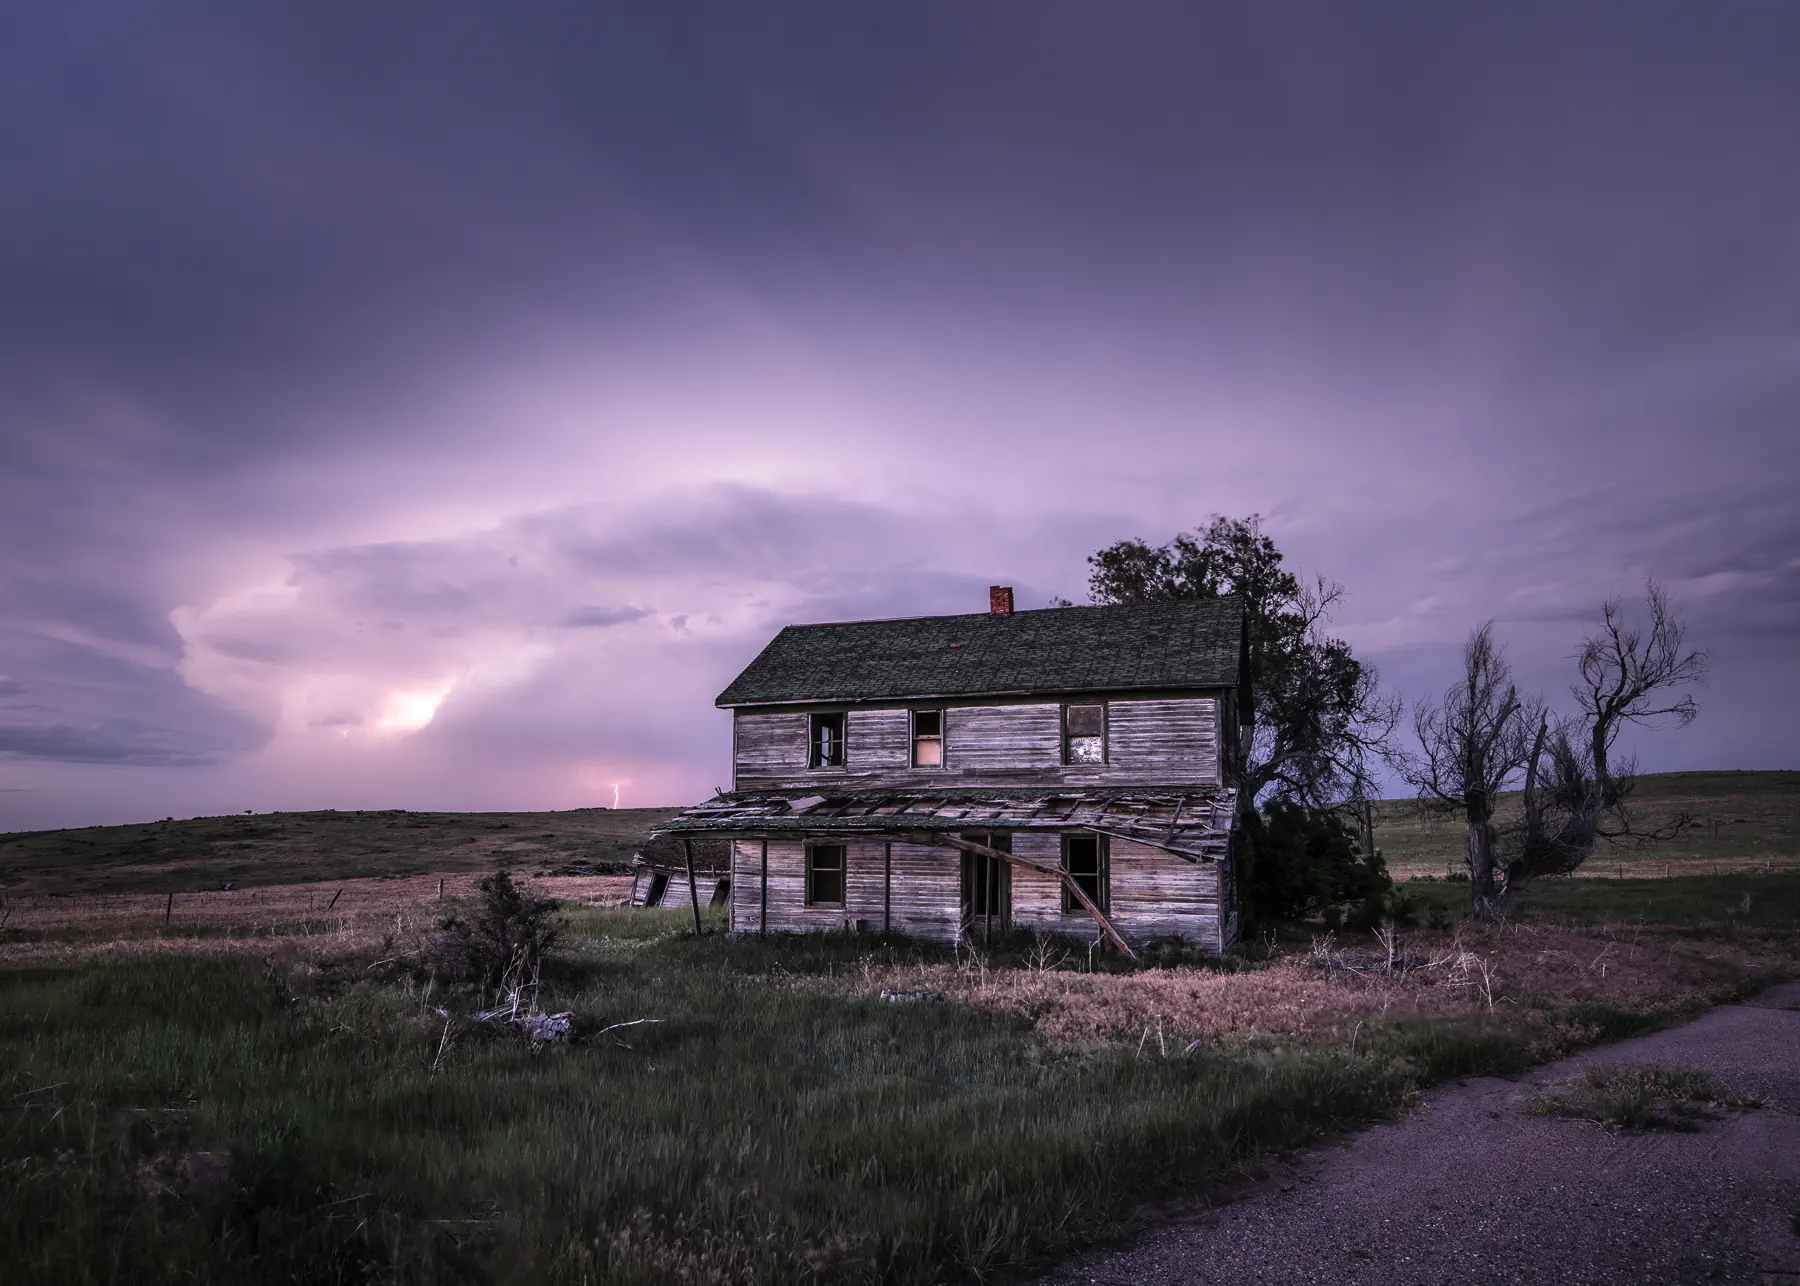
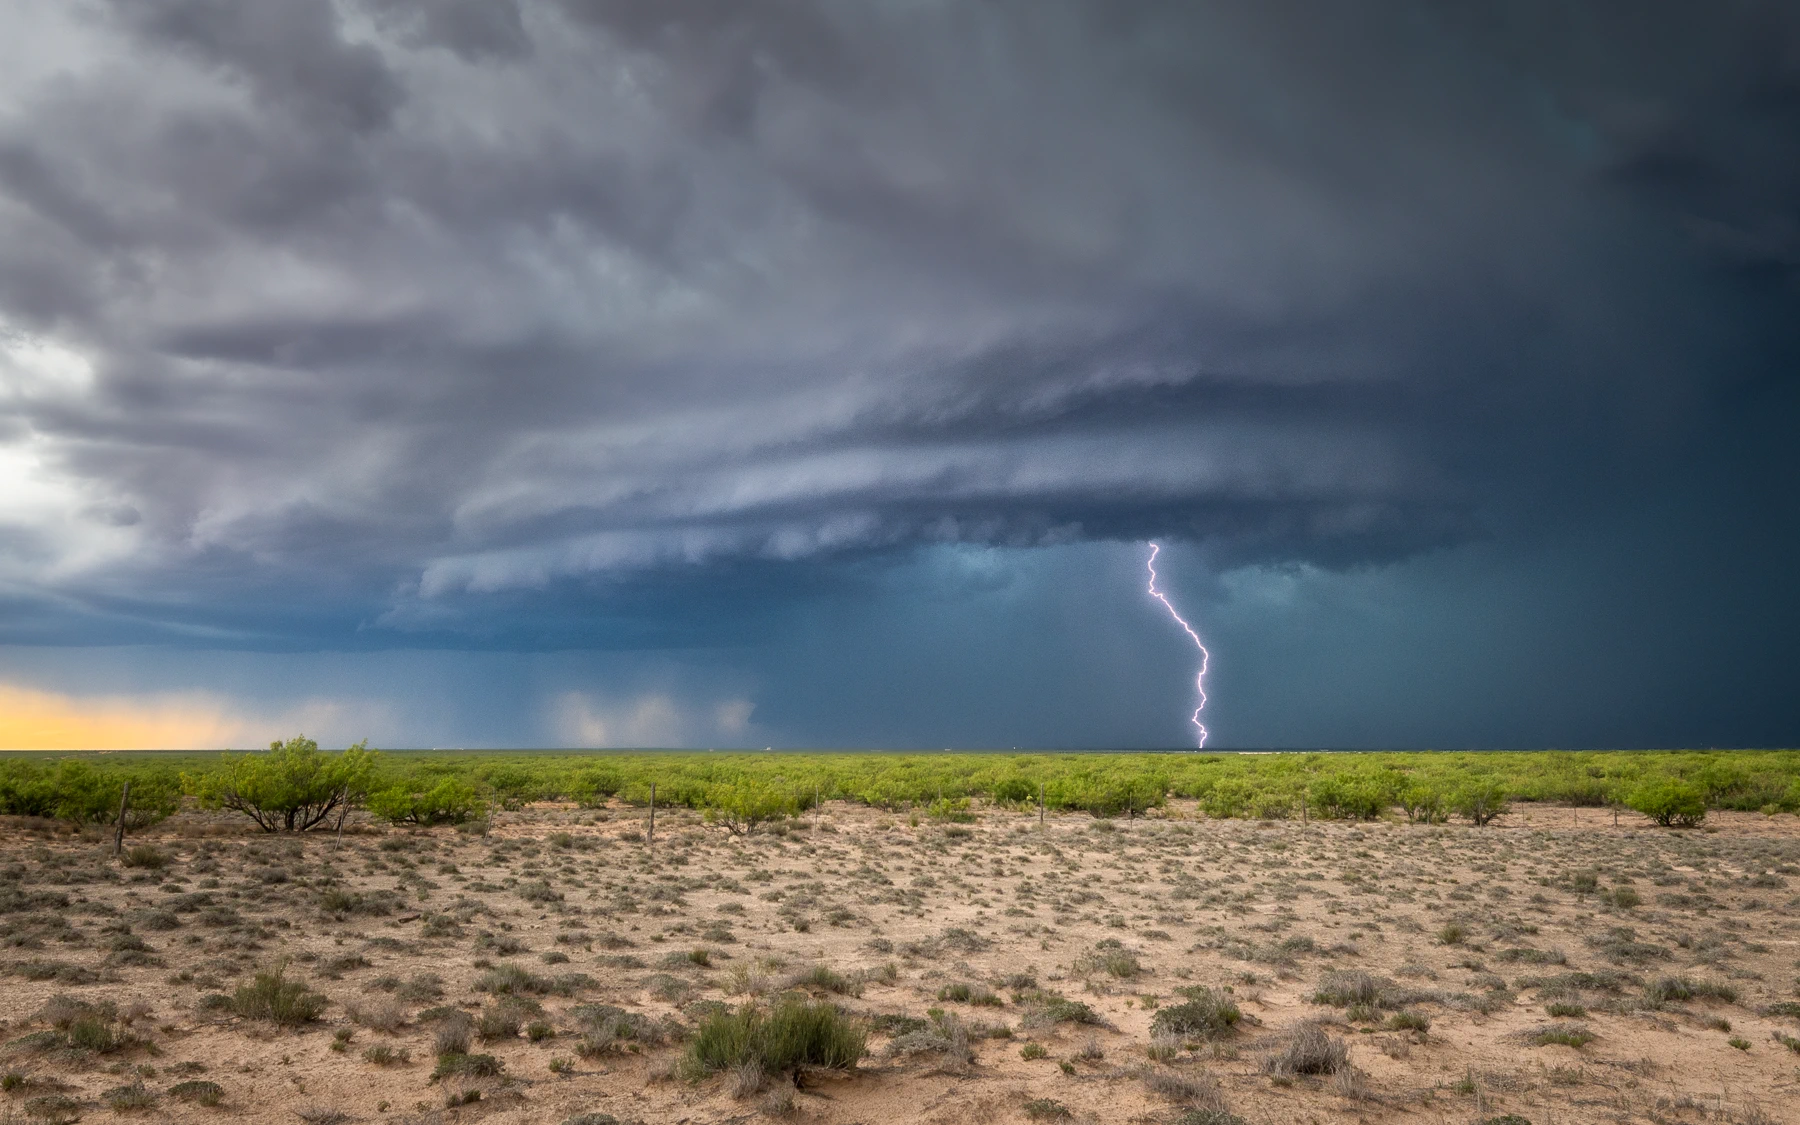
Distant thunder: abandoned farm houses on the Great Plains make for great lightning foregrounds. This was shot with an intervalometer at 15 seconds and f/8.
When you do this, even 30 fps on a high-end sports camera won't cut it if you're shooting at 1/200 of a second (~15% success rate). You want to slow down your shutter speed as much as possible. 1 to 2 seconds is, to me, the ideal. This can be achieved with a tighter aperture and a lower ISO, but once you've reached the limits of the camera, a good neutral density (ND) filter should come into play. I carry NDs with 3 and 6 stops of light reduction.
Extra tip: Most lightning shooting occurs around sunset and the amount of light can decrease dramatically within short periods as sunlight dies down, so ensure to periodically check the exposure of your camera.
With a 1-second shutter speed and ~0.1s required to close and reopen the shutter (camera dependent), the success rate should be around 90%. However, it also means you're shooting 3600 images per second. This would fill the 256 GB card of my D850 in about 20 minutes. I only use the intervalometer method at night when shutter speeds above 10 to 15 seconds are required for proper exposure of the scene, while the rest of the time I use a lightning trigger.
Shooting with a lightning trigger
For day shooting, I use the Lightning Bug (see below for more trigger options). It's a tool that, while pretty simple, is highly configurable. The device integrates a sensor that automatically triggers the camera, like a cable release would do, when it detects the burst of infrared light preceding the actual lightning bolt, as air particles heat up rapidly from the electric current. The Lightning Bug is powered by a 9V rectangular battery which can last for long periods if managed well. In fact, I'm not even halfway through the pack of 4 I bought 2 years ago!
Extra tip: When not using the Lightning Bug for extended periods of time, remove the battery to prevent it slowly leaking energy.
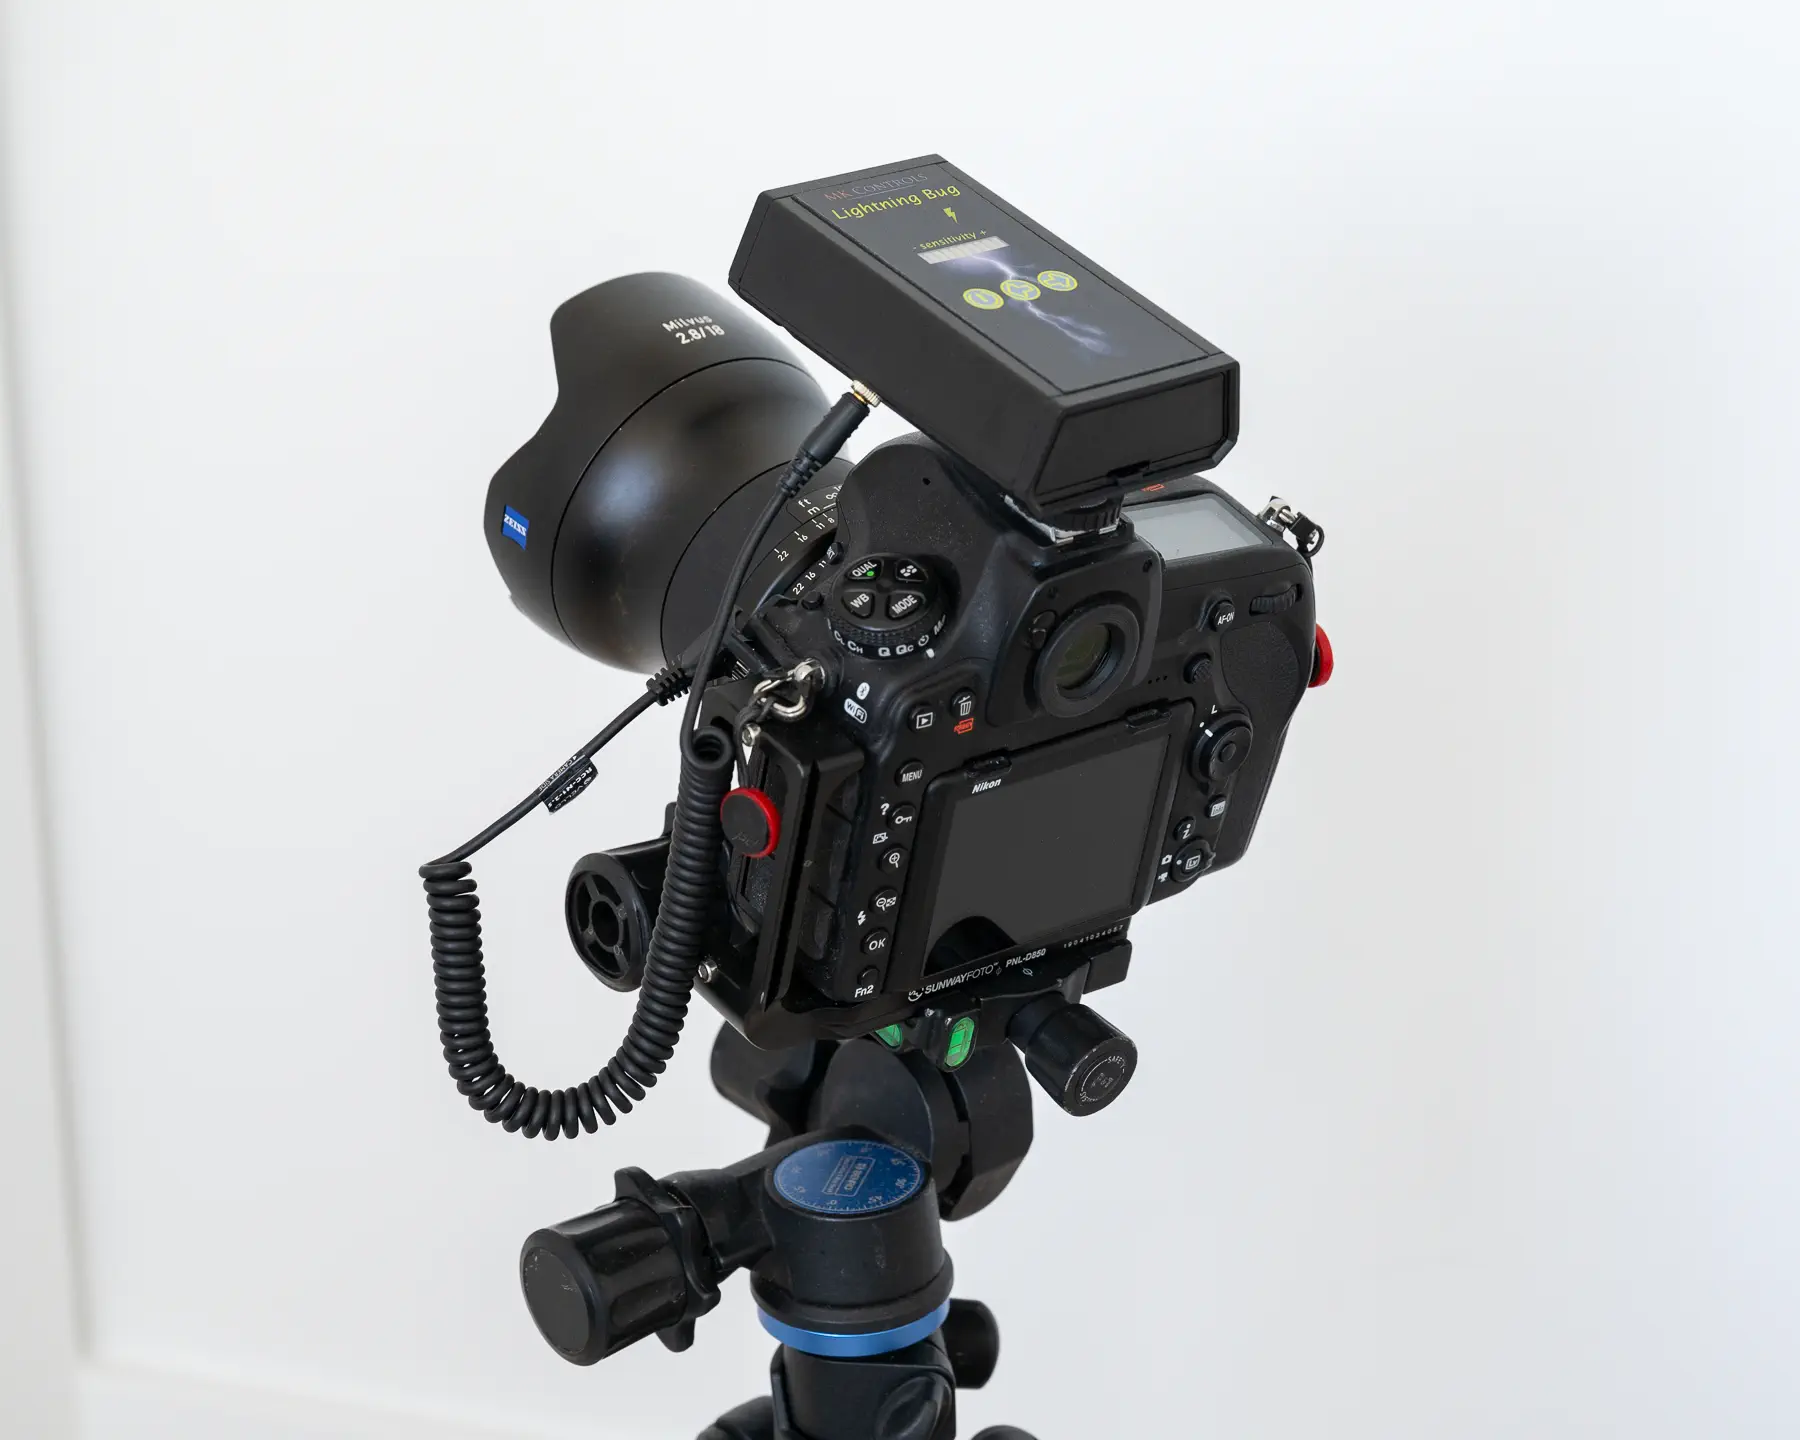
The MK Controls Lightning Bug mounted on my Nikon D850 with Zeiss Milvus 18mm f/2.8 ZF.2; my most common lightning setup.
Let's get dirty. The Lightning Bug should be mounted on the hot shoe of your camera and connected as a normal shutter release. You can turn it on with a long press on the shutter button, and if your camera is on, it should instantly be able to capture lightning. However, I recommend configuring it more extensively before getting started, for better results:
- Sensitivity: With the Lightning Bug turned on, you can adjust sensitivity using the arrow buttons. I tend to use one of the maximum settings, and I crank up sensitivity until the device gives me too many false positives. If you find your camera is constantly being triggered when there is no lightning, as just the sun can emit enough infrared light, try turning down sensitivity a notch or two. There is a small period your camera will be unavailable after a shot, and you want to minimize how often this happens.
- Response time: As the time between the initial infrared burst and the actual visible light can be very short, your camera must respond as quickly as possible when instructed by the Lightning Bug to do so. For example, shooting in Live View will introduce major delays to the camera's response time, so once you've framed your shot, turn Live View off (I don't know how to handle that on mirrorless cameras). You will also notice that several functions become unavailable with the Lightning Bug plugged in; this is because the device simulates a half-press of the shutter button to minimize the camera's reaction time. You can disable this, but your response time will suffer. I usually disconnect the trigger, set up my camera on the tripod, then reconnect it and let it shoot.
- Shutter speed: While the response time is an important factor, not all lightning bolts are created equal and some will be occasionally delayed and some will last an unusually long time. It's therefore important to ensure your shutter is open for a good amount of time once triggered. I recommend a shutter speed of at least 1/8 of a second, but I often go to 0.5 seconds or more. If it's too bright out, I may even combine this with the technique above and slap an ND filter on the lens.
- Burst rate: By default, the Lightning Bug has a rate of 1 frame per second. This means that after a 1/8 exposure, the camera will not fire again for another 0.875 seconds. This is of course configurable by pressing the left arrow and the power button together for 1+ second and entering frame rate mode, where the trigger can be configured up to 10 fps. You should set a value that closely matches the burst rate of your camera and your shutter speed. A configured rate of 8 fps on a camera that maxes out at 5 fps or with a shutter speed of 1/5 second means that signals less than 0.2 seconds apart will miss. I often go for a 1/8 shutter speed (1/7 is not an option) on a 7 fps camera and a burst rate of 6 fps on the trigger.
Those settings should get you started pretty well, but I also recommend you check out the relatively short user manual for a full overview of the Lightning Bug's features (including a section on how to shoot fireworks). During my last trip to the Plains, I was initially having trouble capturing bolts, but I took some time to read the manual during the long drives and was able to get a significant success rate by learning how to use the tool properly.
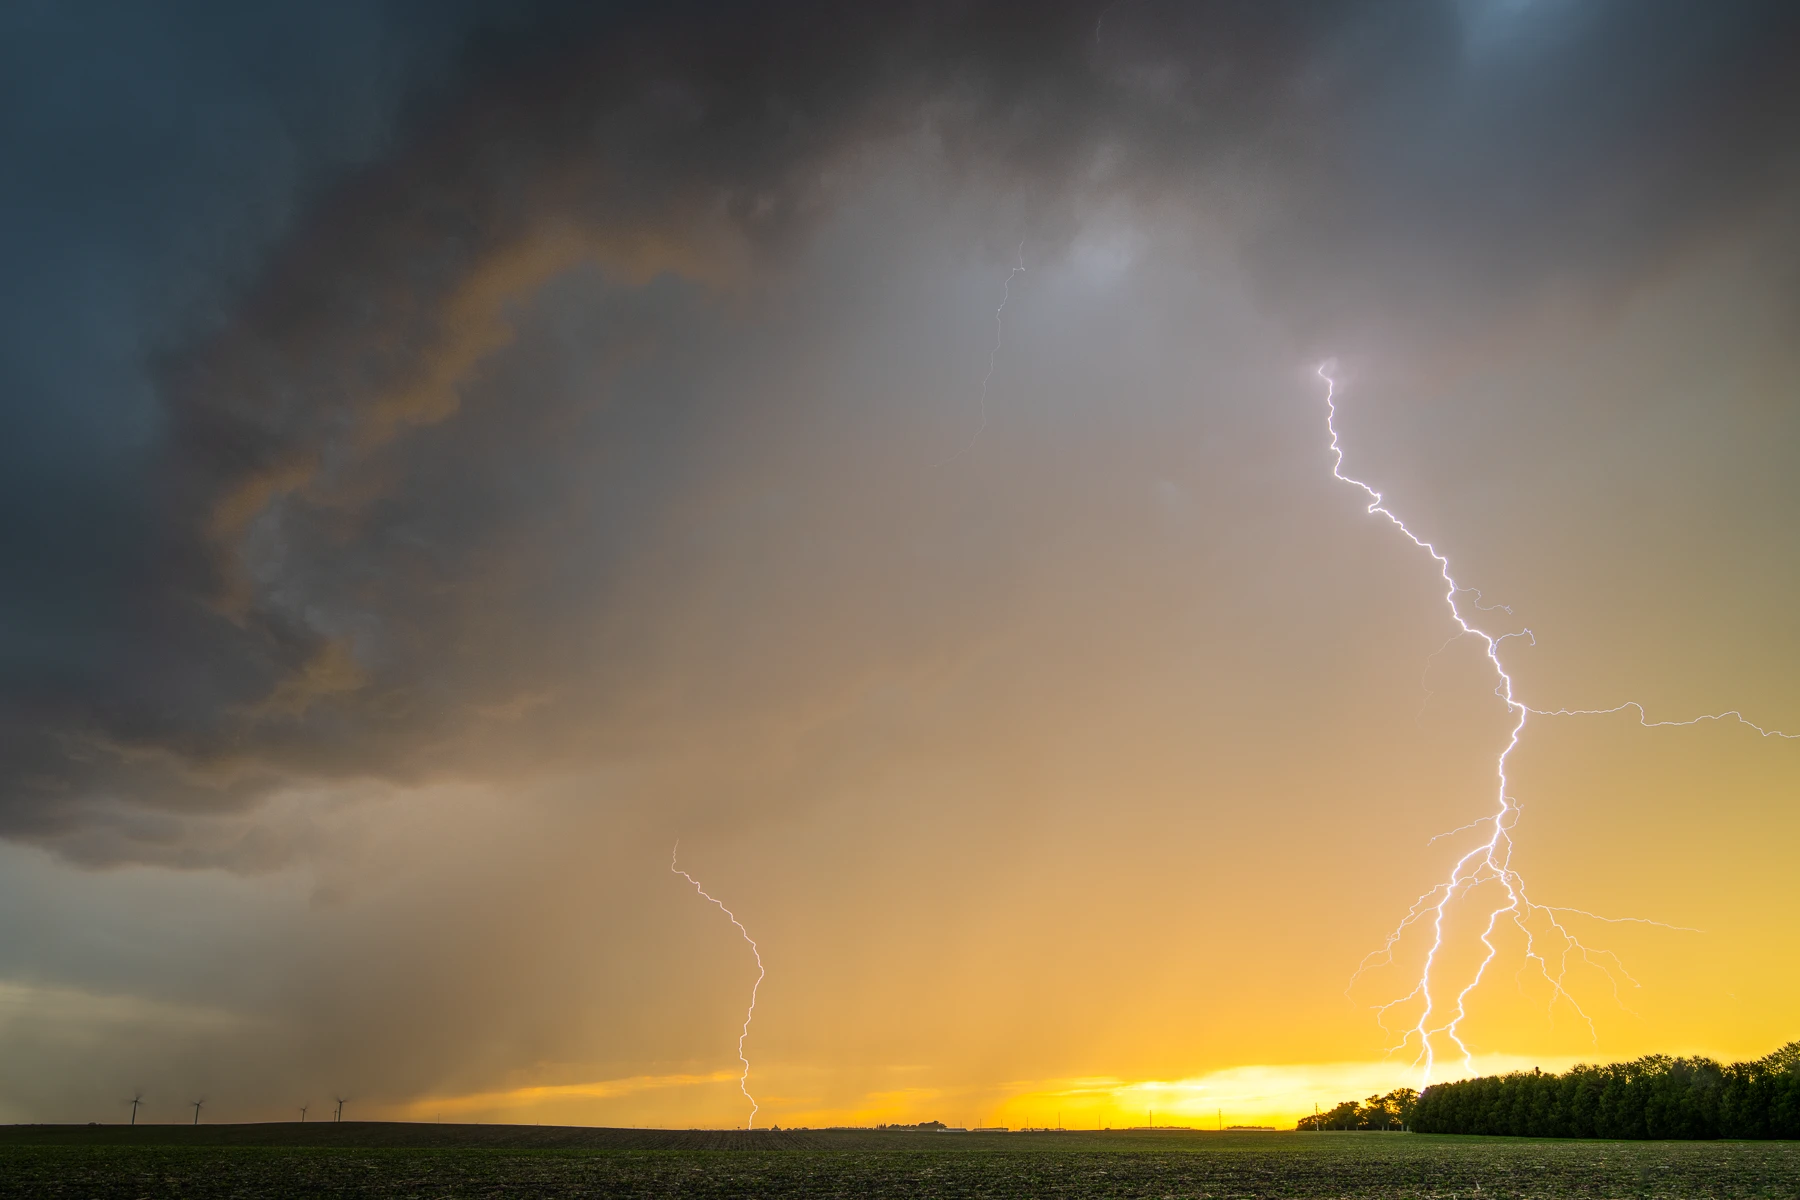
One of my first solid lightning captures, shot with the Lightning Bug.
Other lightning triggers
There are of course other devices on the market; the Lightning Bug (USD 179) was recommended to me prior to my first storm chasing trip and I learnt to use it and I'm now very happy with it.
- Lightning Trigger® (USD 369): Twice as expensive as the Lightning Bug but seems to be very highly recommended. It probably works very well but since I haven't used it, I cannot speak to its merits.
- Miops Camera Trigger (USD 263): I'd say this has mixed to good reviews on B&H. Allows you to trigger your camera with light flashes, sounds, and lasers. Can be an interesting option if you find yourself needing to trigger your camera from sources other than light in different circumstances.
- Pluto Trigger (USD 125): I have one of those and it's decent and comes with a plethora of features. One of those features is capturing lightning, but it's not its specialty. I prefer using the Lightning Bug with the Pluto Trigger as backup.
Additional notes
As I'm writing this, I'm preparing to fly to Oklahoma for a yearly storm chasing trip. I will soon be testing the Lightning Bug thoroughly and will be configuring all my gear for the occasion.
When storm chasing, I usually set the Nikon D850 paired with the Zeiss Milvus 18mm f/2.8 on a tripod capturing lightning, while I walk around with the Nikon Z6 and Nikon 24-70mm f/2.8 getting more angles of the storm structure. I also carry the Nikon 24mm f/1.8 for sun stars (particularly at sunset) and a 70-200mm lens which I rarely use. Overall, the 24mm to 70mm range is the minimum to get decent shots; the 18mm has come in extremely handy in some lucky situations.
All of this is carried completely assembled in my backpack so I can pull out the D850 + Zeiss + Lightning Bug assembly out of the bag as fast as possible and mount it on the tripod.
Storm chasing is a fast-paced game involving skill, technique, but also a fair amount of luck, and when things work out, the shots are unique and unforgettable.
The supercell near Crawford, Nebraska in June 2020. Still a once-in-a-lifetime shot where the 18mm came in really handy. Within minutes of setting up, the structure had become too wide and I had to switch to doing panorama shots.
photography gear tutorials Published